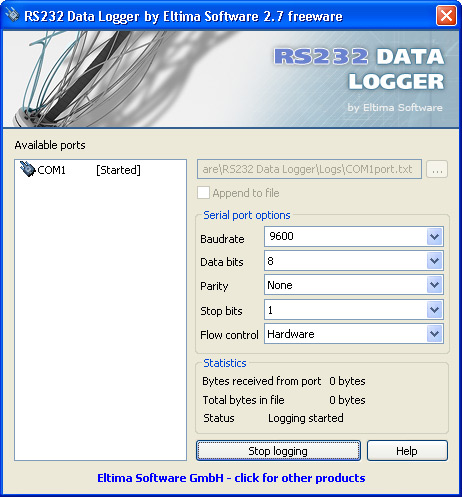
When you launch the application, you will see the following:

RS232 Data Logger features the most simple and intuitively understood
interface. All that you have to do is to select the serial port, specify the
file to redirect to, define the serial port’s parameters and click “Start
logging” button.
- Available ports
Here you may see the list of available serial ports in your system as well as
the logging status (whether the communication data is redirected into a file
already). RS232 Data Logger does not differentiate virtual and real serial
ports. - Log file
“Log file” setting is the text field with the name of the file where the
communication data will be redirected to and “Open file” button that invokes
“Open file” dialog to select the destination text file. Please, note that after
selecting the file you must click “Start logging” button in order to start the
logging process. - Append to file
This option defines whether the communication data should be appended to the
end of the existing file or content of the file should be cleared to start
writing from the beginning. - Serial port options
This group of options allows you to select the communication parameters to
match serial port you want to log. Please, note that specifying incorrect values
will result in a failure to log the data.Baudrate is a rate at which bits are
transmitted (bits per second). In the serial port context, “9600 baud” means
that the serial port is capable of transferring a maximum of 9600 bits per
second. RS232 Data Logger supports all standard baud rates (100, 300, 600, 1200,
2400, 4800, 9600, 14400, 19200, 38400, 57600, 115200, 128000, and 256000 bits
per second).Data bits option specifies the number
of data bits to transmit. Usually, the transferred bits include the start bit,
the data bits, the parity bit (if used), and the stop bits. However, only the
data bits carry useful information. You can configure Data bits to be 5, 6, 7,
or 8. Data is transmitted as a series of five, six, seven, or eight bits with
the least significant bit sent first (little-endian). At least seven data bits
are required to transmit ASCII characters. Eight bits are required to transmit
binary data. Five and six bit data formats are used for specialized
communication equipment.Parity specifies the parity checking
type. Parity can be one of the following: none, odd, even, mark, or space. If
Parity is none, parity checking is not performed and the parity bit is not
transmitted. If Parity is odd, the number of mark bits (1s) in the data is
counted, and the parity bit is asserted or unasserted to obtain an odd number of
mark bits. If Parity is even, the number of mark bits in the data is counted,
and the parity bit is asserted or unasserted to obtain an even number of mark
bits. If Parity is mark, the parity bit is asserted. If Parity is space, the
parity bit is unasserted.Stop bits option defines the number
of bits used to indicate end of a byte. Stop bits could be 1, 1.5, or 2, however
almost all contemporary devices are configured to 1 Stop bit.Flow control defines the Flow control
type. Flow control is usually used to ensure that the receiving serial port
device can handle all of the incoming data sent to it. RS232 Data Logger
provides the following values you can assign to Flow control: Xon/Xoff (commonly
used for asynchronous communication), Hardware and None. - Statistics
RS232 Data Logger offers two counters: “Bytes received from port” and “Total
bytes in file” that display real-time information about data received from the
selected port and total bytes in the logging file respectively. This information
is useful to check whether the communication data is correctly logged. The
serial port status is shown at the corresponding field below. - Start logging
This button enables the logging process for the selected serial port. Once
the serial port is opened, “Start logging” button’s caption will be changed to
“Stop logging”. - HelpThis button launches User Manual you are currently reading.