Searching for torrents
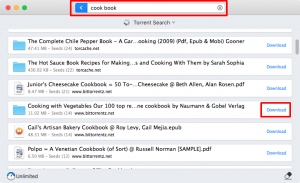
PRO version users have the ability to search for torrents to download them directly from Folx’s interface. Just type your query into the search bar at the top and, once you’ve found a torrent you want, click Download next to it to create a task:
Downloading torrents
1. Create a download task in one of the following ways:
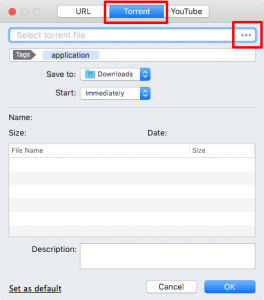
- Select File → New Task in the main menu or press the + button at the top of the main window:
In the dialog that opens switch to the Torrent tab and browse to the torrent file on your hard drive:
- Use Folx PRO’s built-in search to find a torrent of your liking. Add it by pressing Download in the search results.
- Click a magnet link or a .torrent file link on a web page (the latter requires the Use Folx to catch download links in browsers option in Preferences to be enabled).
- Locate a .torrent file in Finder and drag and drop it onto Folx’s window or its icon in the Dock.
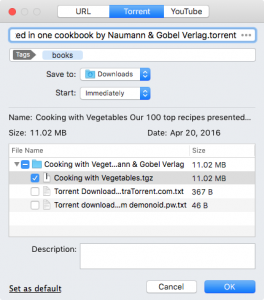
2. Set the download options:
- Tags: assign tags (if none is selected, “other” is assumed).
- Save to: choose the download path.
Select your own, or leave Automatic to let Folx set the download path based on the first tag you have chosen (these paths can be configured on the Tags tab in Preferences). Assigning more than one tag will not affect the download path; rather, in each of the directories set for these tags a link to the file will be created.
- Start: specify whether the download should start automatically, manually or on schedule.
- If the torrent contains multiple files, select which of them you want to download.
- Description: set a description for the files.
Once downloaded, the files will become searchable by this description in Spotlight. To view the description as well as the assigned tags, locate a file in Finder, select Get Info from the right-click menu and check the Comments section.
- Set as default: click to remember the current settings. These settings will be automatically applied the next time you add a task.
3. Press OK to finish adding the task.
Setting download priority for the files in a torrent
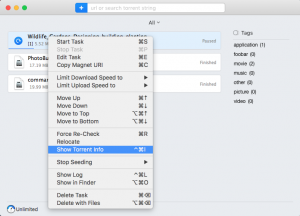
To assign download priority to the files in a torrent, right-click the respective download task and select Show Torrent Info:
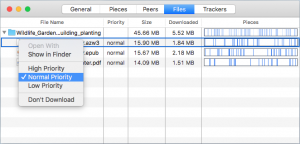
In the dialog that opens, switch to the Files tab, right-click a file and set the priority: Low, Normal (default) or High:
Creating a torrent file
The process of creating a torrent is pretty straightforward. The crucial part is finding a website that allows torrent uploads so you can share your file with other people.
Let’s take a closer look at the steps involved in creating and sharing a torrent:
- Select File → Create torrent file in the main menu.
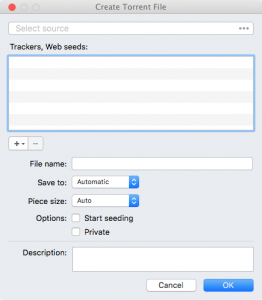
- In the dialog that opens, configure the following:
- Select Source: choose the files or directories on your computer to upload.
- Trackers, Web seeds:
A tracker is a special type of server that coordinates the communication between peer computers. When you open a torrent, your computer contacts the tracker and requests a list of peers available for connection.
Web seeding is a feature of the BitTorrent protocol that allows clients to download torrent pieces from an HTTP source (a web server) in addition to the swarm. It is used to guarantee the availability of the download even when there are no peers currently sharing it.
If you are using any public trackers or web seeds, add them here using the + button.
- File name: choose the name for your torrent file.
- Save to: choose location on your hard disk to save the torrent file to. If you leave Automatic, the file will be saved under ~/Downloads/Torrent Files.
- Piece size:
Choosing the right piece size is a matter of balance. Too large pieces can slow down piece distribution, whereas too small pieces will waste peers’ connection bandwidth on the overhead data. To get a reasonably small torrent file and an efficient client and swarm download, it is recommended to stay in the range of 1000-1500 pieces per torrent, opting for 32 KB piece size for very small torrents (50 MBs and less) while not exceeding 1-2 MB piece size for large torrents (2 GB and more).
If you are not sure what piece size to choose, leave Auto.
- Start seeding: if this option is checked, seeding will start automatically as soon as you upload the torrent file (usually on a public tracker). Disable this option if the site you are uploading to requires the torrent to be re-downloaded for seeding (this is usually the case for sites that use passwords or cookies).
- Private: checking this option will disable DHT (Distributed Hash Table) and PEX (Peer Exchange), thus leaving no other peers sources except the tracker itself. This will also mean that you won’t be able to get the torrent data if the tracker is down.
- Description: specify a description for your torrent. If a tracker supports displaying comments, this description will be visible in the tracker’s Comments field.
- Press OK to finish creating the torrent.
A My uploads tag will be automatically assigned to the torrent files you’ve created, so you’ll be able to easily find them on your hard drive using Spotlight.
- Upload your newly created .torrent file to some torrent hosting website.
- Finally, seed the file.
Seeding is required to transmit your file to others. On public trackers seeding starts automatically once the upload is complete. Some private trackers require that you re-download the .torrent file from their tracker in order to start seeding. Be sure to seed long enough. When you get several copies distributed into the swarm, you may disconnect.
