Before adding a new torrent task it is recommended to customize torrent download/upload settings. Choose “Torrent” tab in Preferences:
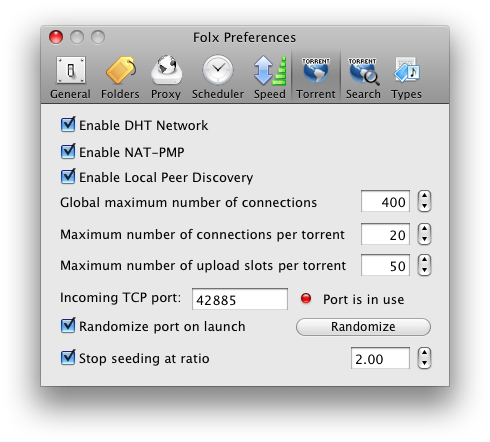
- “Enable DHT Network” option enables the Distributed Hash Table. This option, if checked, permits you to connect to peers not only from the tracker you get a torrent file from, but also to peers, downloading this torrent file from anywhere on the net and connected to DHT network. This option helps to find peers while a tracker is down and to provide trackerless torrent files downloading.
- “Enable NAT-PMP” option permits to enable an NAT Port Mapping Protocol used to automatically configure NAT (Network Address Translation) on your network. When your machine is behind an NAT router, it usually has an IP address that is different from your IP address on the Internet. In this case parties outside the private network are not able to respond to you. The router changes your internal IP address to the outside one. This process is called “Network Address Translation”.
- “Enable Local Peer Discovery” option allows Folx to attempt to discover local peers. If disabled, only external peers will be discovered.
- Global maximum number of connections field defines the maximum number of connections that Folx can make at any given time in all active torrent downloads.
- Maximum number of connections per torrent field defines the maximum number of peers that Folx can connect to at any given moment for each torrent download.
- Maximum number of upload slots per torrent sets the number of peers you upload to for one torrent at any given time. The fewer slots you make available the faster you will upload to each peer. Making more slots available will increase your chances of getting data. But making too many slots available may make many clients blacklist you because you are uploading to them too slowly.
- Incoming TCP port is the listening port that accepts incoming connections. It permits external BitTorrent clients to reach your client. Each port possesses a unique number called the “TCP port number”. The default port number is 14082. You may want to specify another one instead, for example, if the port is busy for some reason. If you are not sure what port number to specify, ask your system administrator.
Note: If you have a router, you will have to set up port forwarding which helps you open a port in your router for outside connections. If you have a firewall, you will have to add the port to the exceptions list which will permit the port to bypass your firewall.
The port number you’ve set will be saved after Folx restart, unless “Randomize port on launch” option is checked.
- You may also try to apply “Randomize” option. It is used to select a random port number for the listening port. Check “Randomize port on launch” option to change a port number each time Folx is started.
Note: If you have a router or firewall, access to a randomly chosen port may be denied by a router or firewall for security reasons.Note: UPnP and NAT-PMP port forwarding provides automatic connection, without your manual intervention. So, if you have UPnP or NAT-PMP enabled, you will have to disable them in case you want to select a random port number for the listening port.
- Stop seeding at ratio: This option permits to stop seeding torrents as soon as ratio reaches the specified value. Forced stop of seeding might be useful when you need the bandwidth for something else (for example, start downloading a queued torrent) or when you simply get limited bandwidth from your Internet provider. By default, “Stop seeding at ratio” option is disabled.
Note: When “Stop seeding at ratio” checkbox is ticked, the ratio value, specified here, will be applied to all torrent tasks in Downloads list (provided “Global Settings” option is ticked in the context menu). Read Seed torrent files section for more details.