1. Switch to “Create connection” tab.
2. Specify connection name to identify this configuration. By default, SEC will input the closest possible name based on your settings, for instance, COM5 [Server].
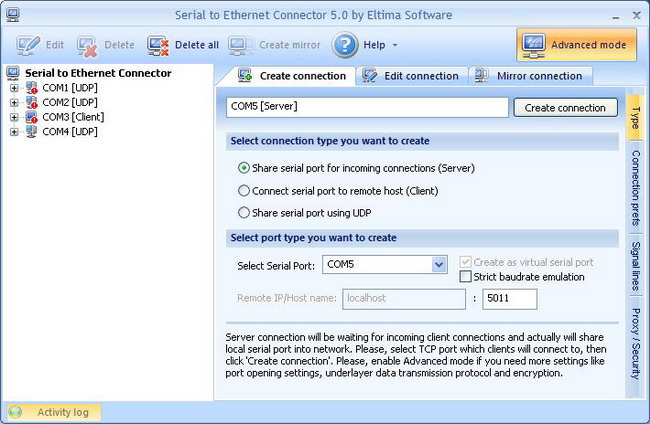
3. Select connection type you want to create. In this case it is “Share serial port for incoming connections (Server)”.
For instance, you can connect serial device to COM1 port at the server side and read all its data from your application connected to COM255 at the client’s side.
Please, note that serial port name must not contain spaces inside.
In case you are feeding incoming data to the application directly, you can safely tick “Create as virtual serial port” checkbox, provided that application accepts non-standard COM port names (some programs may have COM1/COM2/COM3/COM4 option only).
Serial to Ethernet Connector supports serial COM ports overlapping. It means that virtual serial port can have the same name as existing physical COM port. If overlapped virtual COM port is created, it will be accessed instead of physical one.
5. Tick “Strict baudrate emulation” checkbox if you want to enable baudrate emulation.
Baudrate emulation permits virtual ports to work with the same speed as real ones. It might be useful when a virtual port is connected to a real port. Baudrate emulation equalizes their speed, thus allowing to avoid data losses.
6. Specify local TCP port number which the server will listen to. Make sure this port is not blocked by firewall (if any) and is not used by other servers in your system (DNS, SMTP, IIS, etc.) If you are not sure, please, don’t modify this value.
7. Finally, click “Create connection” button in Main window. Once connection is successfully created, you can see your connection in Connections tree.
8. Open local serial port. You may use Windows HyperTerminal utility for this purpose. This step is necessary only if you want to verify the successful creation of connection.
6. Create “client” connection at the remote end and make sure that remote host name and port number match the ones you set in server’s configuration.
9. Now you are ready to start communication process with default settings. You can also refer to Editing “server” connection section if you want to edit your connection settings.
Alternatively, you can use Mirror connection option, to automatically configure the remote end.
You can consult Setting up connection settings, Signal lines, Proxy and security settings sections to find out more information on configuring all available settings after activating Advanced mode.